account activate arrange arrow_down arrow_right arrow_up breadcrumbs browse contact cookies delete dismiss edu_app edu_cdr edu_epub edu_hotmath edu_interactive edu_online edu_pdf edu_tlkt edu_trp edu_wrkbk errata event expires_soon home login logo_click logo_hover logo_icon logo_scroll logout menu menu_close my_details my_resources new notification notifications_number phone small_facebook small_google+ small_twitter small_youtube social_fb social_fb_hover social_g+ social_g+_hover social_twt social_twt_hover social_you social_you_hover store support view_all


Practice IT for the Australian Curriculum Book 2: Middle Secondary


To access your resources Log inor create your Cambridge GO account Activate your resources by entering the access code found in the front of your print textbook, sealed pocket or supplied via email.

Practice IT for the Australian Curriculum is designed to keep students in step with the ever changing world of IT with easy to follow modules, engaging activities and a flexible structure.

Written to suit both the Australian Curriculum: Digital Technologies syllabus and the general ICT capability, Practice IT for the Australian Curriculum works both for stand-alone IT courses or for use across the curriculum.

What’s new:

  • Updated content covering new key technologies used in the classroom along with theoretical explanations, step-by-step instructions and activities.
  • Significant coverage of the Australian Curriculum, including the Digital Technologies syllabus and General Capabilities such as the ICT literacy and numeracy capabilities.
  • Introductory chapters that explore the ethical use of IT and other relevant computer awareness topics, such as cyberbullying.
  • Interactive Textbooks that include exercises for each module to cover alternative software programs, digital comprehension activities, supporting data files, videos and other rich interactive content.
     

What you already love:

  • A practical approach to IT with easy-to-follow modules full of engaging exercises and structured projects allowing students to practice and develop their IT skills.
  • The flexible structure that allows teachers to use the modules to form a complete IT course or as discrete units to meet the ICT requirements of any course across the curriculum.
     

To view a sample chapter, click on the file below in blue.

Full PDF Textbook

  • Practice IT for the Australian Curriculum Book 2: Middle Secondary [PDF 34.3mb]

PDF Textbook chapters

  • Preliminary material [PDF 1.0mb]

  • Module 1: Computer awareness.pdf [PDF 3.9mb]

  • Module 2: Social and ethical practice in IT [PDF 1.9mb]

  • Module 3: Word processing [PDF 1.8mb]

  • Module 4: Flash animation [PDF 2.6mb]

  • Module 5: Computer graphics [PDF 2.8mb]

  • Module 6: Photo editing [PDF 1.7mb]

  • Module 7: Spreadsheets [PDF 5.8mb]

  • Module 8: Databases [PDF 1.9mb]

  • Module 9: Webpage authoring [PDF 7.7mb]

  • Module 10: Desktop publishing [PDF 3.1mb]

  • Module 11: Algorithms and programming [PDF 5.0mb]

  • Glossary and acknowledgements [PDF 0.5mb]

You are entitled to download and store these PDFs. However they may not be transferred to another party, including other students, as electronic or print versions.

To use the enhanced PDF functions, such as note taking, you must download these PDFs to your computer and open them with Adobe Reader 9 or later.

The PDF Textbook is designed for full functionality using the latest version of Adobe Reader. The markup function is available in selected PDF readers for the iPad and other devices using iOS. Check your PDF reader specifications. At the time of publication, Adobe Reader, Good Reader and PDF Expert were viable options.

Note that some PDF file names may comprise the ISBN and chapter number.


You must have Adobe Reader installed to view the PDF files.


    Book 1 Interactive Textbook preview chapter

    Full title now available. You must log in and have a subscription to access the full product.

    Module projects, additional and alternative exercises are available in the Interactive Textbook.

    Now available

    1 September 2017

    p. 54: Exercise 7, step 1 - 'open the WP Exercise 8' changed to 'open the WP Exercise 7'

    p.62: Text added: 'Adobe Flash is a popular program for creating animation that can be used in computer games, online displays or websites. Recently its name was changed to Adobe Animate and the instructions in this module can be used with either Adobe Flash or Adobe Animate. There are also exercises available online that refer specifically to Adobe Animate.' and image shrunk to fit new text

    p. 63: Step 1 - 'Load Flash (or Animate)...' added

    p. 70: Step 1 - 'Create a new Flash (or Animate)...' added

    p. 74: Step 1 - 'Create a new Flash (or Animate)...' added

    p. 77: Step 1 - 'Create a new Flash (or Animate)...' added

    p. 79: Step 1 - 'Create a new Flash (or Animate)...' added

    p. 88: Exercise 1 - existing text replaced with 'A cone shape will be created using the drawing tools.
    Setting the Grid
    Most vector-based drawing programs provide a grid to make accurate drawings easier to do. 
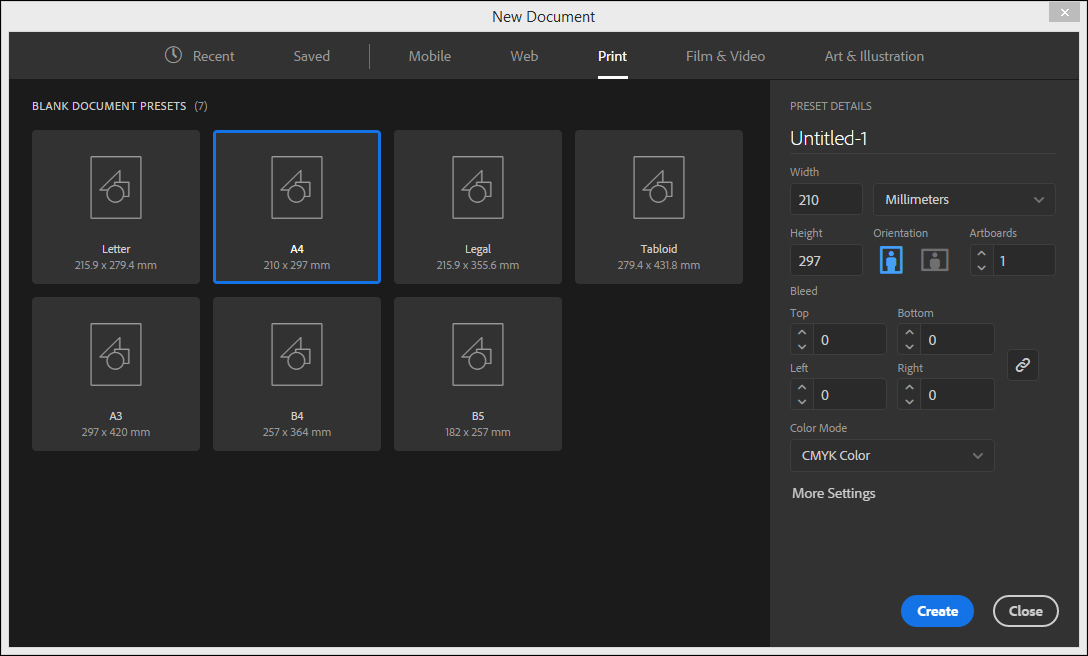
    1. Load Adobe Illustrator and, in the Welcome screen, click on NEW to open the NEW DOCUMENT dialogue box.
    2. Open the PRINT category and select the A4 preset (or use the default settings). Check that the UNITS are set to MILLIMETRES, the ORIENTATION is set to PORTRAIT and select CREATE.'

    p. 88: Image replaced with:

    p. 108: Step 1 - text replaced with 'Click on the SELECT AND MASK button in the OPTIONS BAR and set the VIEW box in the Select and Mask dialogue box to ON WHITE with a 100% OPACITY.'

    p. 110: Exercise 3, step 3: 'The FILE SIZE of the image is displayed under the image' changed to 'The FILE SIZE of the image is displayed in the FILE name at the left of the dialogue box.'

    p. 126: Exercise 3, step 4: 'SORT ASCENDING' changed to 'SORT A TO Z'

    p. 133: Exercise 7, step 6: After 'sum', '(total)' added

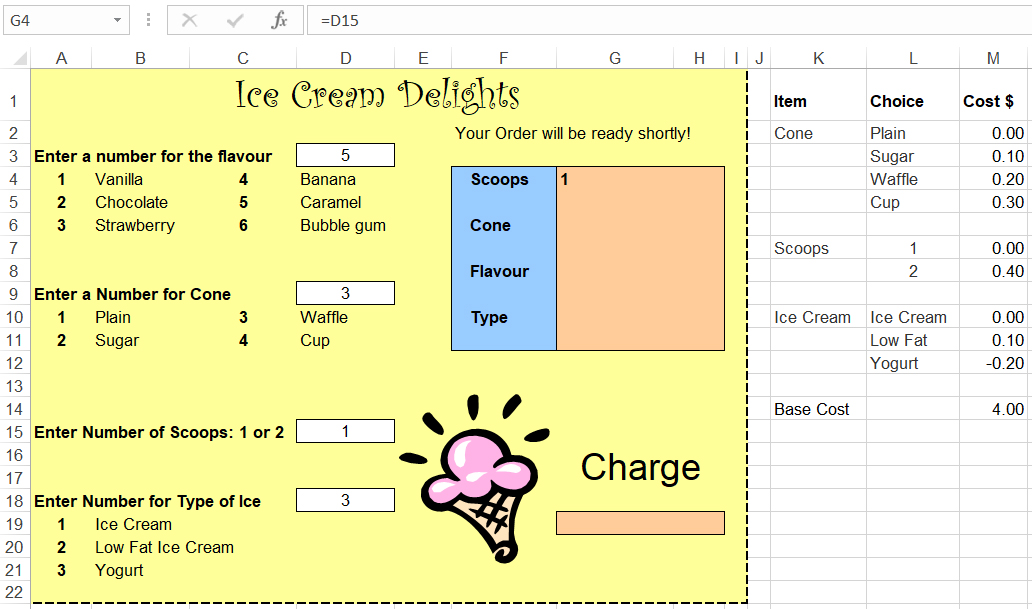
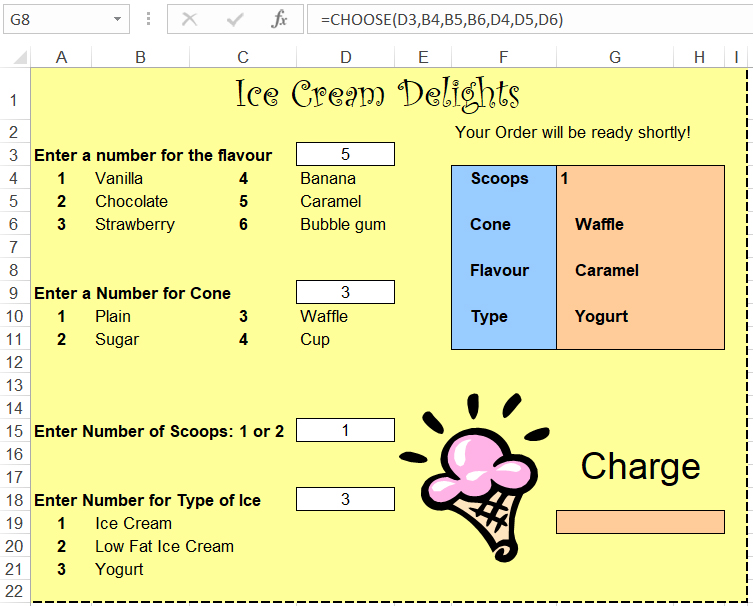
    p. 139: Image replaced with:

    p. 140: Image replaced with: 

    p. 140: Exercise 13, step 12: text changed to 'Check that cell G4 will display the number of scoops entered as set up on the previous page.'

    p. 170: Exercise 1, step 2: text changed to 'Load Adobe DreamWeaver and create a NEW HTML DOCUMENT. If the FRAMEWORK option is visible, it should be set to NONE.'

    p. 171: Exercise 2, step 2: text changed to 'Display the TOOLS menu, highlight CSS and select CONVERT INLINE CSS TO RULE.'

    p. 172: Exercise 2, step 5: text changed to 'Display the TOOLS menu, highlight CSS and select CONVERT INLINE CSS TO RULE.'

    p. 173: Exercise 2, step 4: text changed to: 'You can click on the REAL-TIME PREVIEW icon in the STATUS BAR at the base of the page and select a browser to see how the page looks.'

    p. 175: Exercise 3, steps 3 and 6: text changed to 'Display the TOOLS menu, highlight CSS and select CONVERT INLINE CSS TO RULE.'

    p. 177: Exercise 4, step 4: text changed to 'Highlight the top row cells by dragging across them then display the EDIT menu, highlight TABLE and select MERGE CELLS so that there is just one cell across the top of the table.'

    p. 183: Exercise 7, step 7: text changed to 'Open the index.html page and preview it in a browser by clicking on the REAL-TIME PREVIEW icon in the STATUS BAR. Check that the links work correctly then close the browser.'

    p. 189: Exercise 9, step 2: text changed to 'Display the EDIT menu, highlight TABLE and select INSERT ROWS AND COLUMNS.'

    p. 190: Exercise 10 image replaced

    p. 199: Exercise 1, steps 1-4: text replaced with
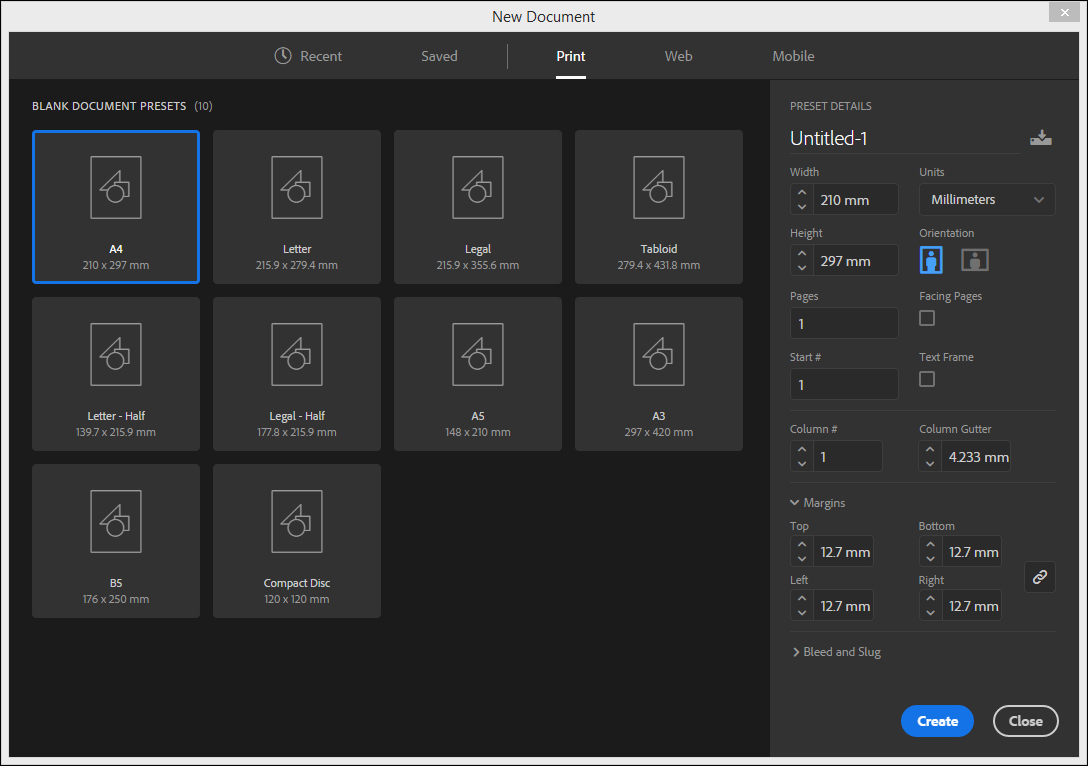
    1. Load Adobe InDesign and click on the NEW button in the Welcome screen.
    2. In the NEW DOCUMENT dialogue box select the PRINT category and select the A4 Preset.
    3. Check that the UNITS are set to MILLIMETRES, turn off FACING PAGES and leave the MARGINS at their default settings (12.7 mm). These setting can be changed when needed.
    4. Select CREATE to start the document.

    p. 199: Image replaced with:

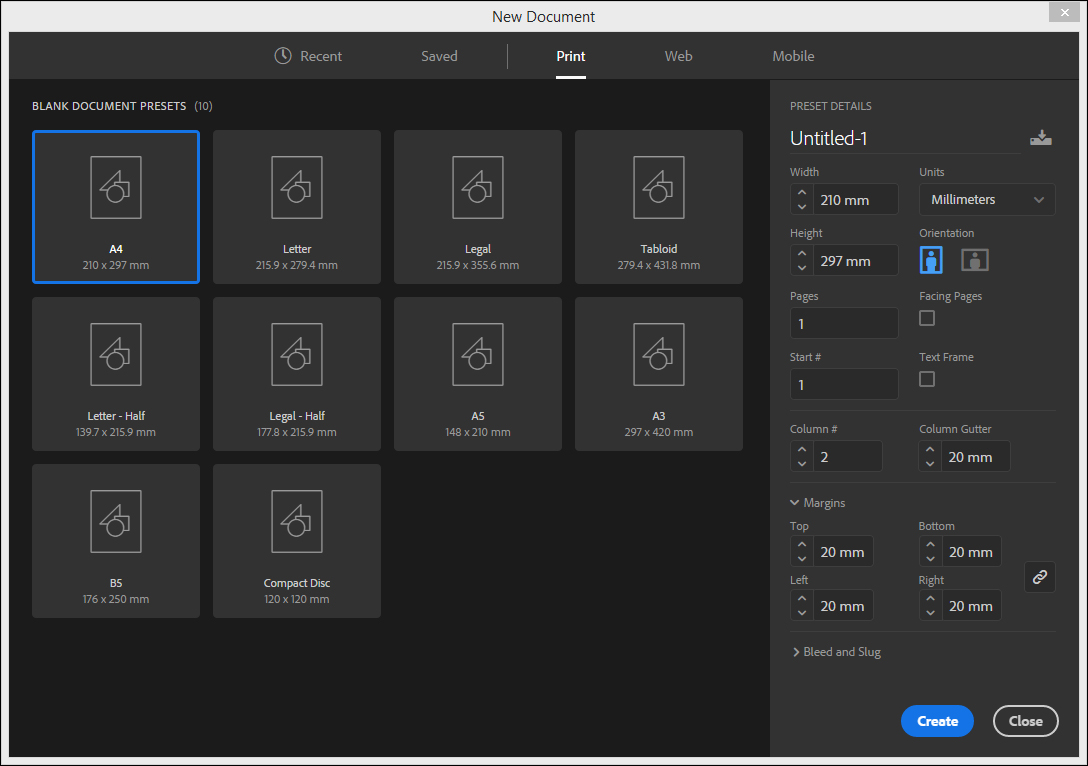
    p. 205: Exercise 2, steps 1-2: text replaced with
    1. Start a NEW document and, in the PRINT category of the NEW DOCUMENT dialogue box, select the A4 preset and set the UNITS to MILLIMETRES.
    2. Turn off FACING PAGES and set the COLUMNS to 2 with a 20 mm GUTTER. In the MARGINS section set the four margins to 20 mm and select CREATE.

    p. 205: Image replaced with:

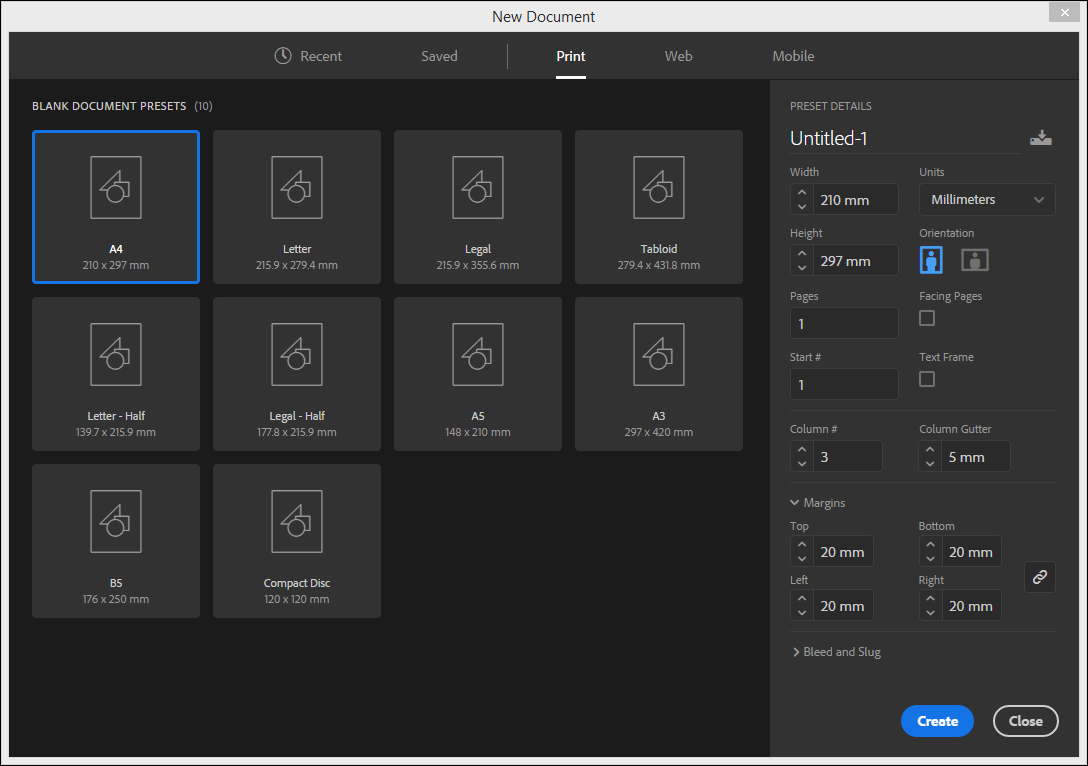
    p. 211: Exercise 3, steps 1-2: text replaced with
    1. Start a NEW document and, in the PRINT category of the NEW DOCUMENT dialogue box, select the A4 preset and set the UNITS to MILLIMETRES.
    2. Turn off FACING PAGES and set the COLUMNS to 3 with a 5 mm GUTTER. In the MARGINS section set the four margins to 20 mm and select CREATE.

    p. 211: Image replaced with:

    Module 7: Exercise 15a: Support file updated

    Adobe is updating their CC software usually twice a year at the moment. Some of these updates could affect the way the activities operate in the Practice IT textbooks, so this section will highlight any software changes.

    The changes below are based on the 2016 updates to the Adobe CC software.

    Module 6: Photo Editing (when using Adobe Photoshop CC)


    Photo Editing Exercise 1

    Adobe have changes the Refine Edge dialogue box to the Select and Mask dialogue box, so point 1 under Refining the Edges on page 108 should now read:  

    1   Click on the SELECT AND MASK button in the OPTIONS BAR and set the VIEW box in the Select and Mask dialogue box to ON WHITE with a 100% OPACITY.

    Photo Editing Exercise 3

    In Point 3 on page 110, the file size is now only displayed in the FILE name at the left of the dialogue box.

    Authors

    Kerryn Maguire, Greg Bowden